SnapGene
A folder containing all required sequences can be downloaded in .zip format
Contents
- 1 Load vector sequences in SnapGene
- 2 Changing annotation of sequences in SnapGene
- 3 Changing what you see in SnapGene
- 4 Designing primers in SnapGene
- 5 Simulate PCR in SnapGene
- 6 Restriction cloning in SnapGene
- 7 Fusion-based cloning in SnapGene
- 8 Gateway cloning in SnapGene
- 9 TA and GC cloning in SnapGene
Load vector sequences in SnapGene
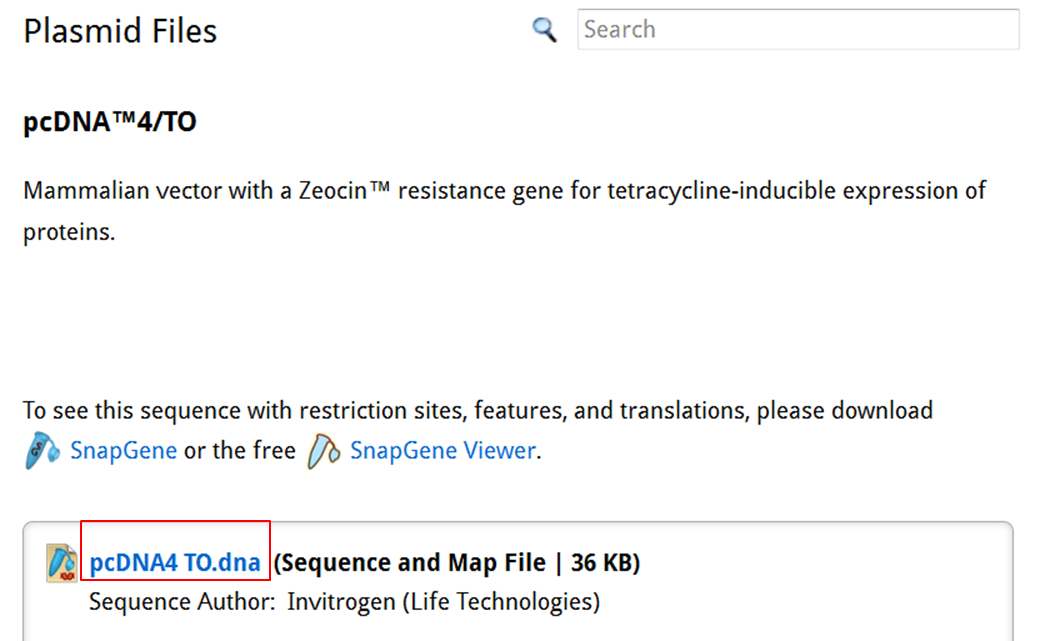
SnapGene has its own database of vector sequences. As an example, we will import the sequence of vector pcDNA4/T0.
On the SnapGene list of mammalian expression vectors scroll to pcDNA4/TO and click the link to go to the plasmid file where you can download the sequence and the annotation e.g. location of exons, CDS, UTR's, names....
| Download the annotated sequence of pcDNA4/TO from SnapGene. |
|---|
| On the webpage of pcDNA4/TO click the pcDNA4 TO.dna link to save the file: |
| Open the annotated sequence of pcDNA4/TO in SnapGene. |
|---|
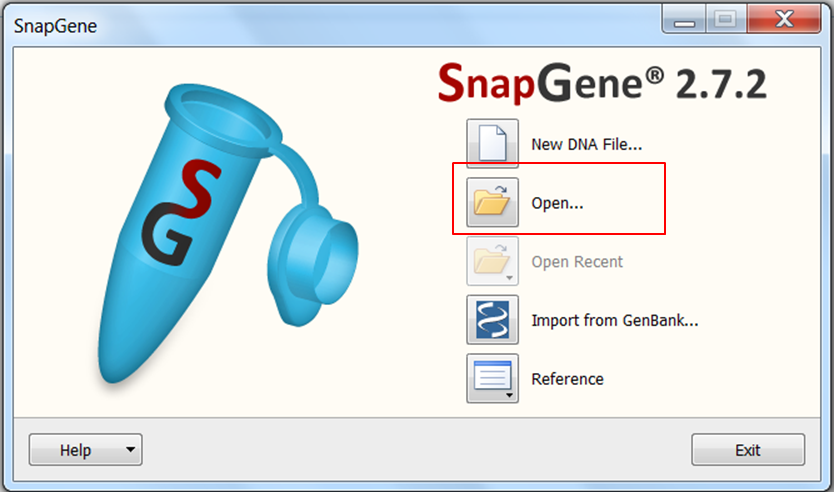
| Open SnapGene and select Open in the startup menu:
Browse to the pcDNA4 TO.dna file and open it. |
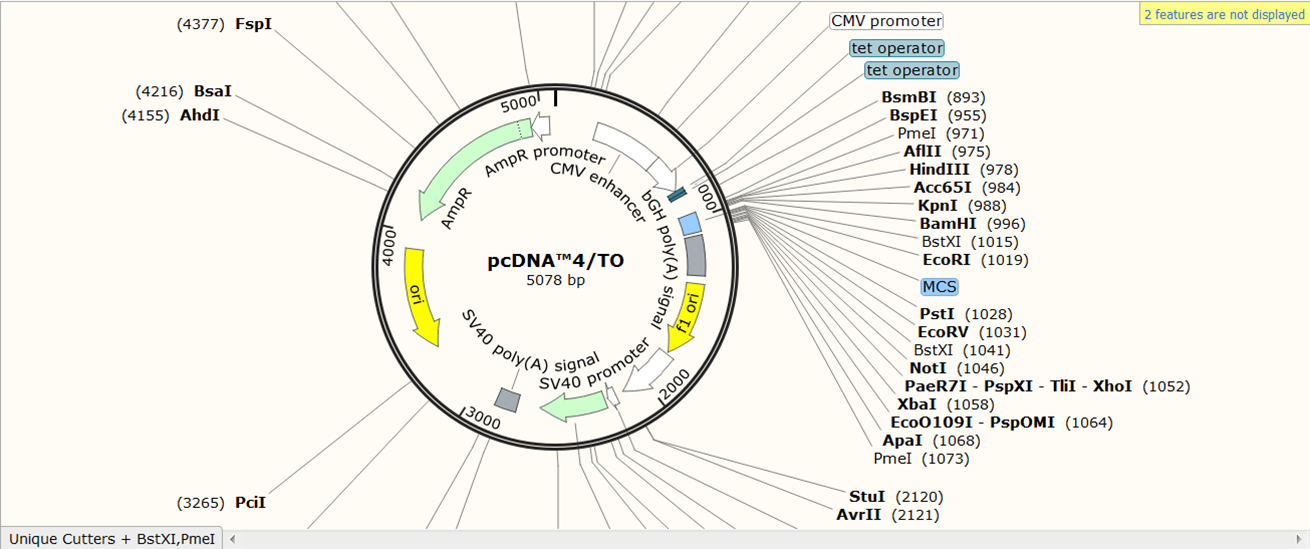
You now see the circular view of the vector with restriction sites automatically visualized:
Exercise: load the sequence of vector pAcGFP1-C1
This vector is available in SnapGene's list of fluorescent protein genes and plasmids. Try to load it without peeking at the solution.
| Load vector pAcGFP1-C1. |
|---|
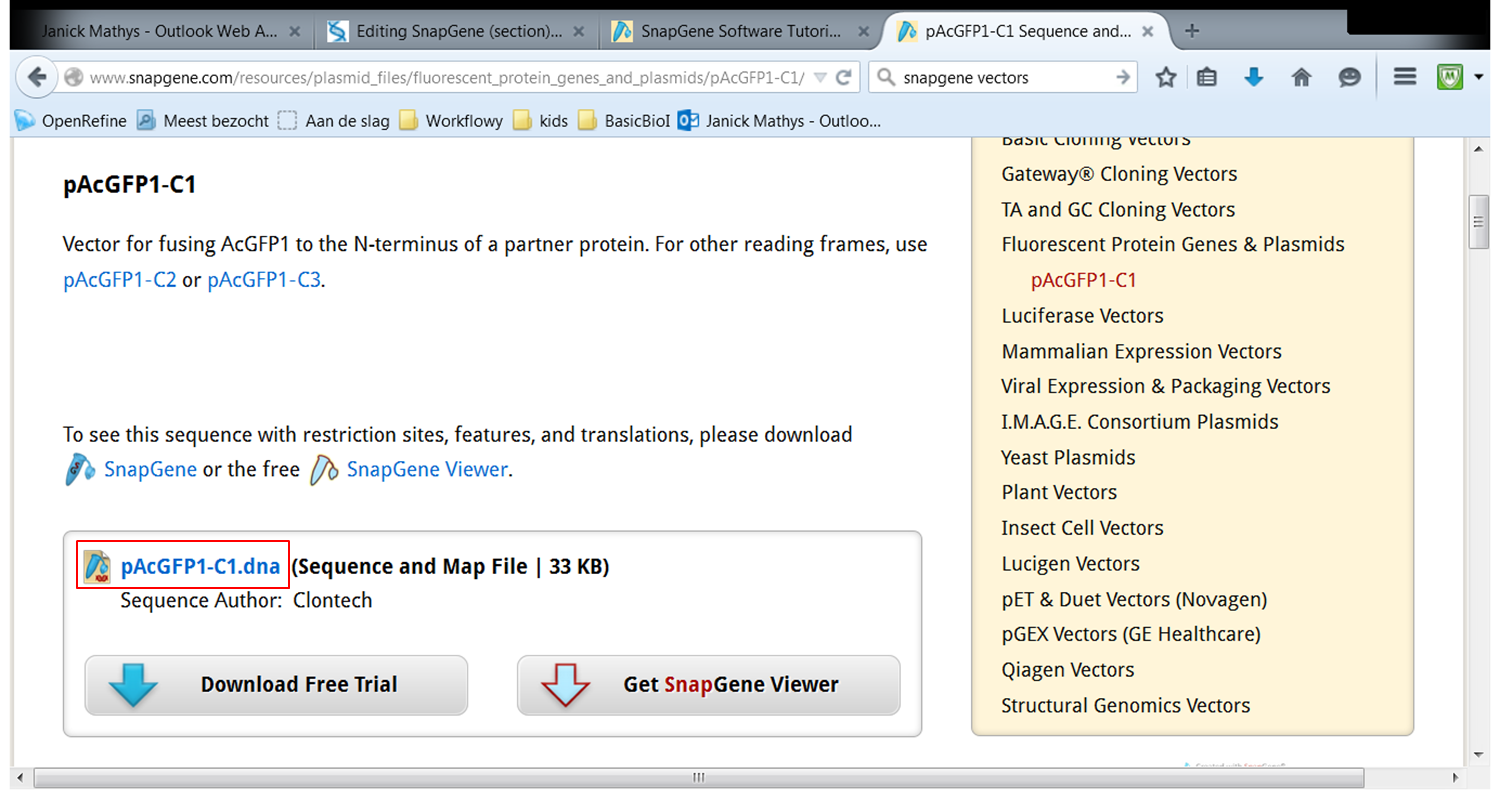
| On the webpage of pAcGFP1-C1 click pAcGFP1-C1.dna:
Go back to SnapGene and click the Open button in the top menu: Browse to the pAcGFP1-C1.dna file and open it. |
Loading vector sequences from other resources
However, not all vector sequences are stored in the SnapGene database. Fortunately, many vectors are available from Addgene, an organization that improves sharing of plasmids.
In SnapGene you can load sequences directly from Genbank or you can load them by importing a file. Even if you don't load them from Genbank it is still a good idea to import them in Genbank format (and not in Fasta format). Genbank format not only contains a sequence but also all annotations. If you load the annotations (in Genbank format) SnapGene will automatically show them.
| Obtain the annotated sequence of mRFP-Rab5 from Addgenes. |
|---|
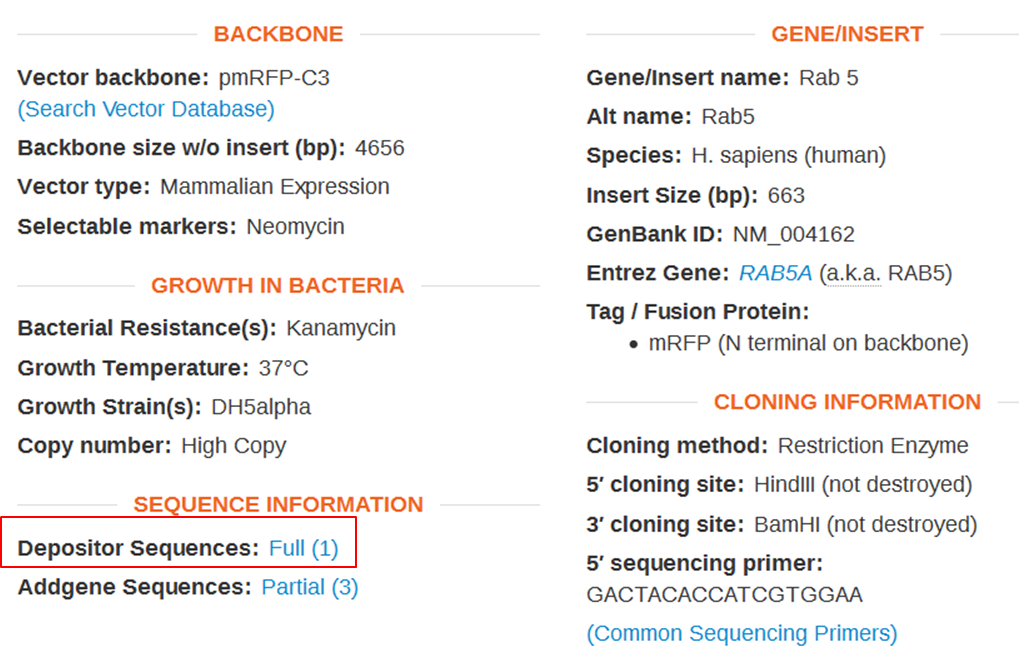
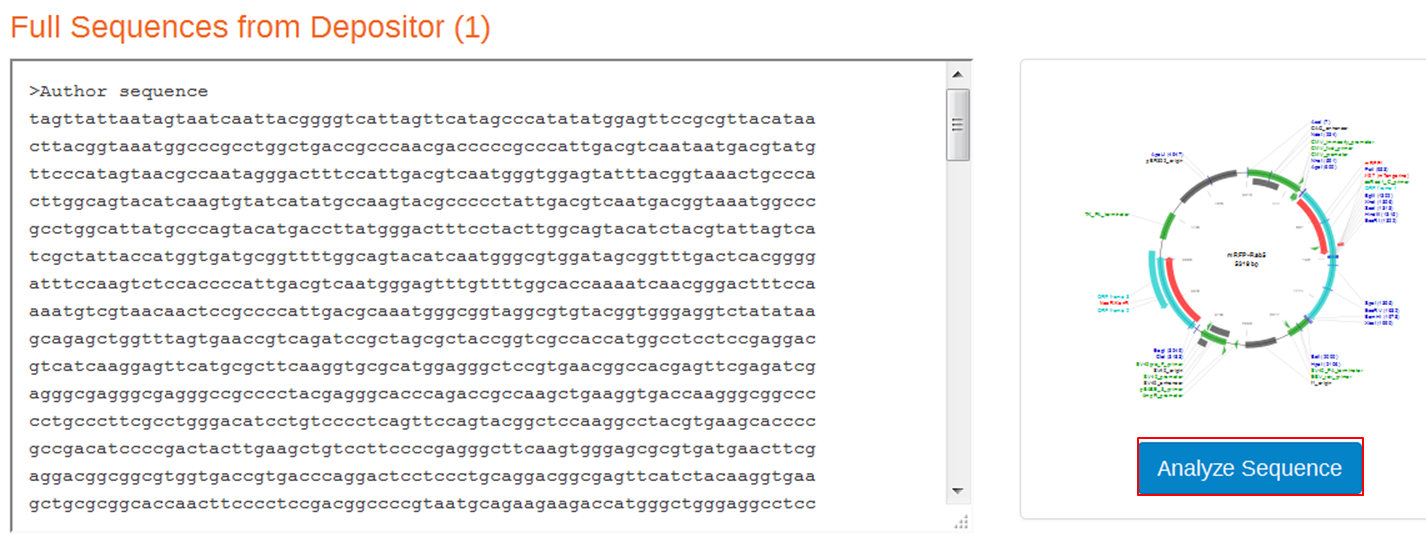
| On the webpage of mRFP-Rab5 go to the SEQUENCE INFORMATION section and click Full (1) next to Depositor Sequences:
On the next page containing the full sequence of the vector, click the Analyze Sequence button on the right: On the next page select the Sequence tab: To include the annotation, you need the sequence in Genbank format: Copy the text and paste it in Notepad. Save the file as mRFPrab5.txt |
| Open the annotated sequence of mRFP-Rab5 in SnapGene. |
|---|
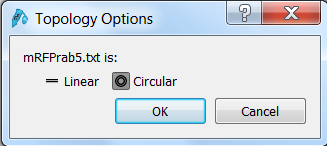
| Click the Open button in the top menu, browse to the mRFPrab5.txt file and open it. SnapGene will ask you wether the sequence is linear or circular. Since it's a vector sequence, select circular:
Click OK to open the sequence in SnapGene. |
Changing annotation of sequences in SnapGene
Although we imported mRFP1-Rab5 in Genbank format, the annotation that was included in the file was not complete:
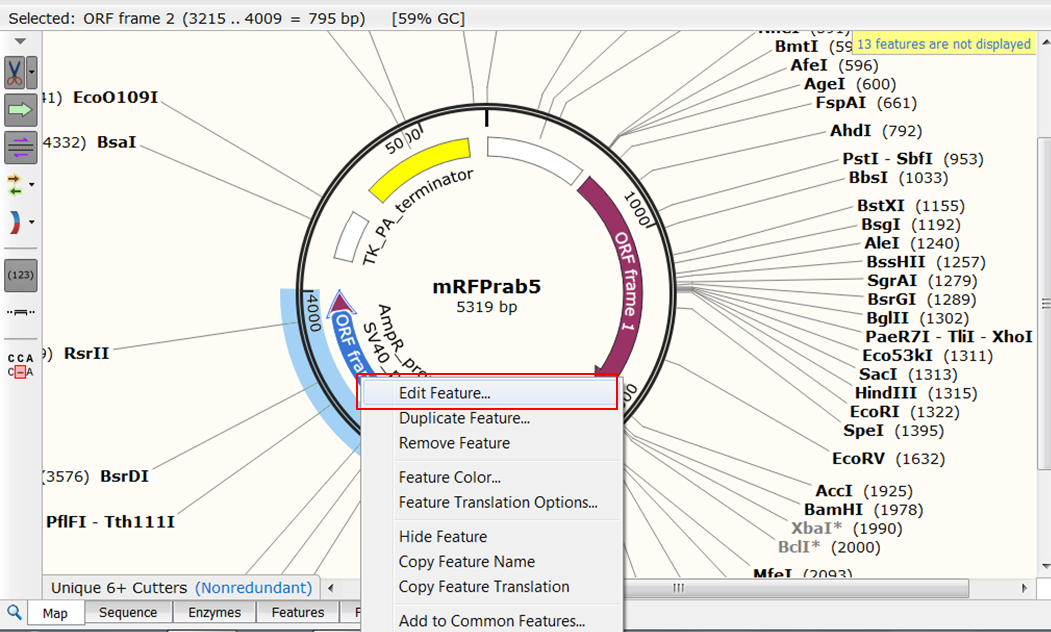
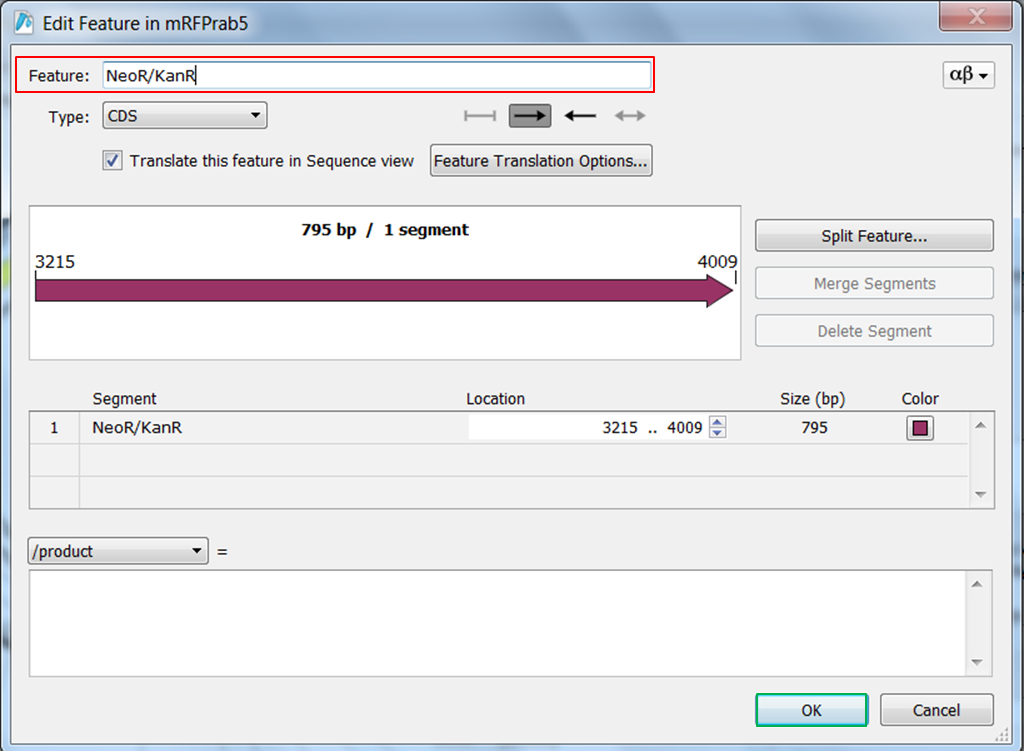
- what is called ORF frame 2 in the map is a neomycin/kanamycin resistance gene
- what is called ORF frame 1 in the map is a fusion between mRFP1 (a red fluorescent protein) and human Rab5 (a small GTPase that is a key regulator of intracellular membrane trafficking) gene
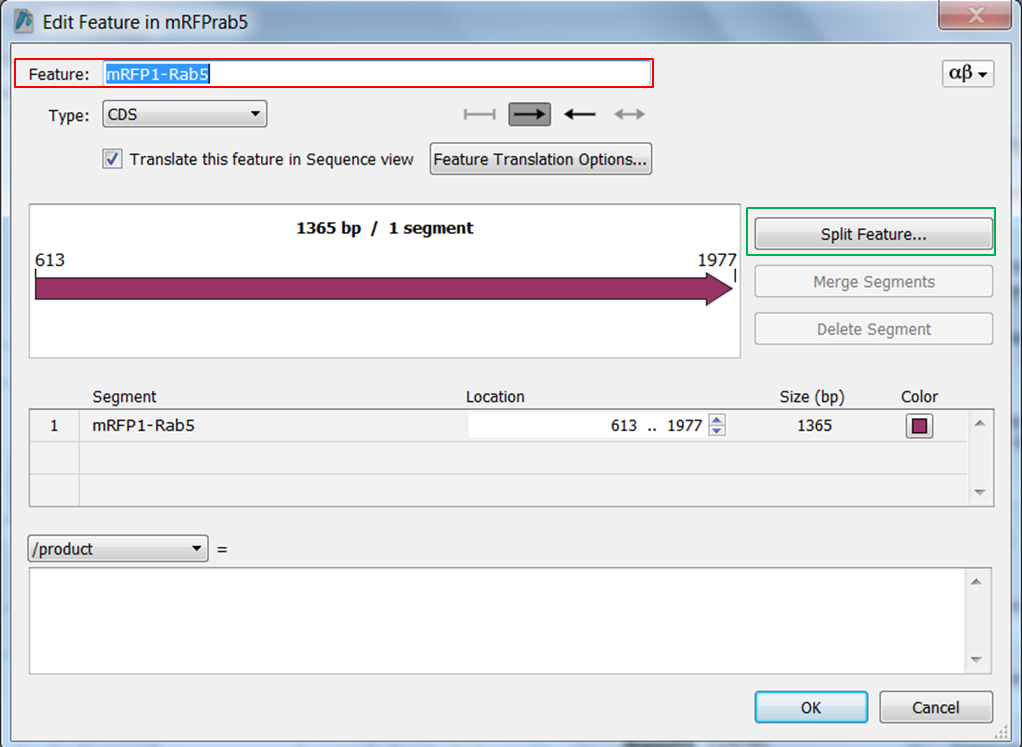
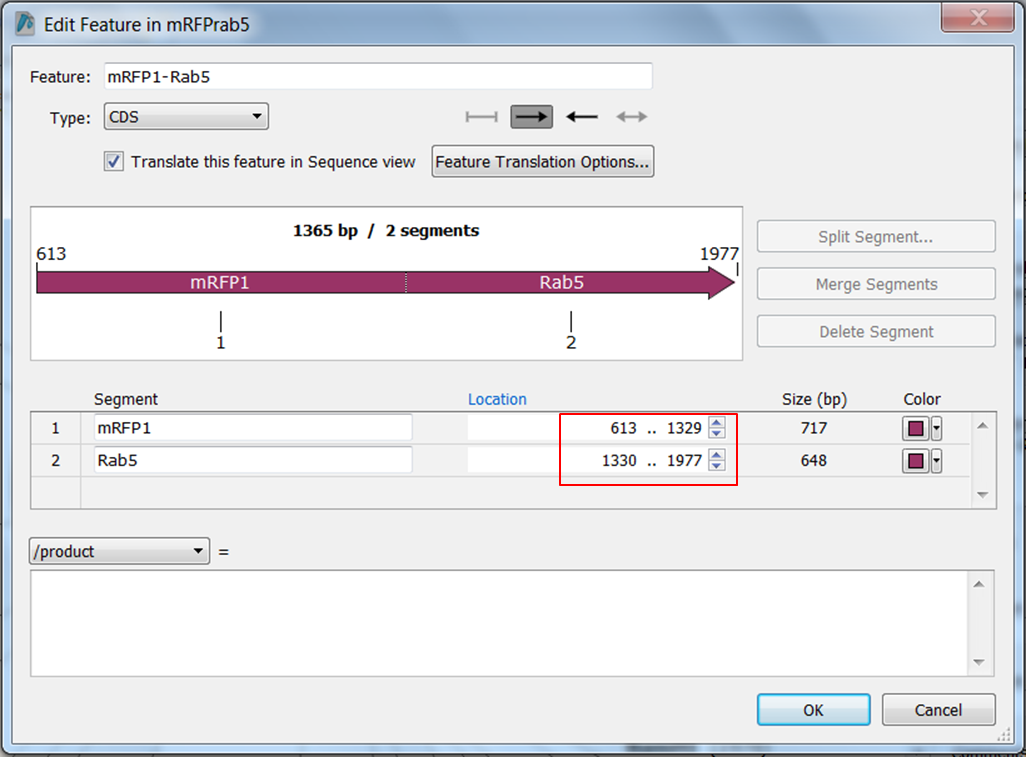
We are going to correct the annotation: change the names of the ORFs and split ORF frame 1 into two parts:
- mRFP1 from position 613 to position 1329
- Rab5 from position 1330 to position 1977
To switch back to mRFPrab5 click Window in the top menu and select mRFPrab5.
| Change the name of ORF frame 2. |
|---|
| Right click ORF frame 2 in the map and select Edit Feature:
Change name of the feature in NeoR/KanR and click OK: |
| Change the name of ORF frame 1 and annotate it as a fusion. |
|---|
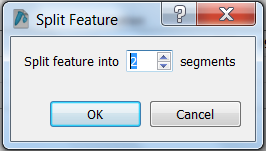
Split the feature into 2 segments: Fill in the names, start and stop positions of the two genes and click OK: |
See the introduction tutorial video and the working with features tutorial video for further details on how to annotate sequences in SnapGene.
Changing what you see in SnapGene
Go to the Changing what you see in SnapGene tutorial to see how you can switch between views, change a view, show additional info...
Designing primers in SnapGene
SnapGene is not the ideal tool for designing primers. It does not take into account the ability of primers to form hairpins or dimers nor does it check the specificity of the primers.
Primer dimer formation is highly efficient because the primers are in vast excess compared to the amount of template in PCR (see VDUs blog)
Go to the Primer design in SnapGene tutorial to see how you can use SnapGene to design primers
So only when you have no flexibility in your choice of primers, I would use SnapGene to design them. This is often the case in cloning experiments when the primer has to be located at the start of the coding sequence.
If you want to design primers for other applications where efficiency and specificity of the primers has to be taken into account, you shouldn't use SnapGene, use CLC Main Workbench or Primer-Blast instead.
Simulate PCR in SnapGene
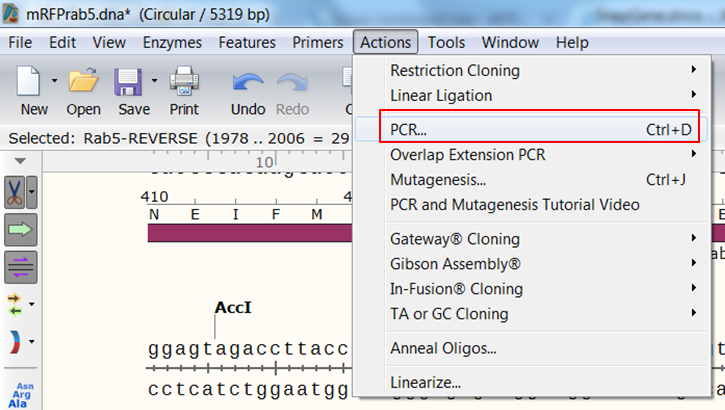
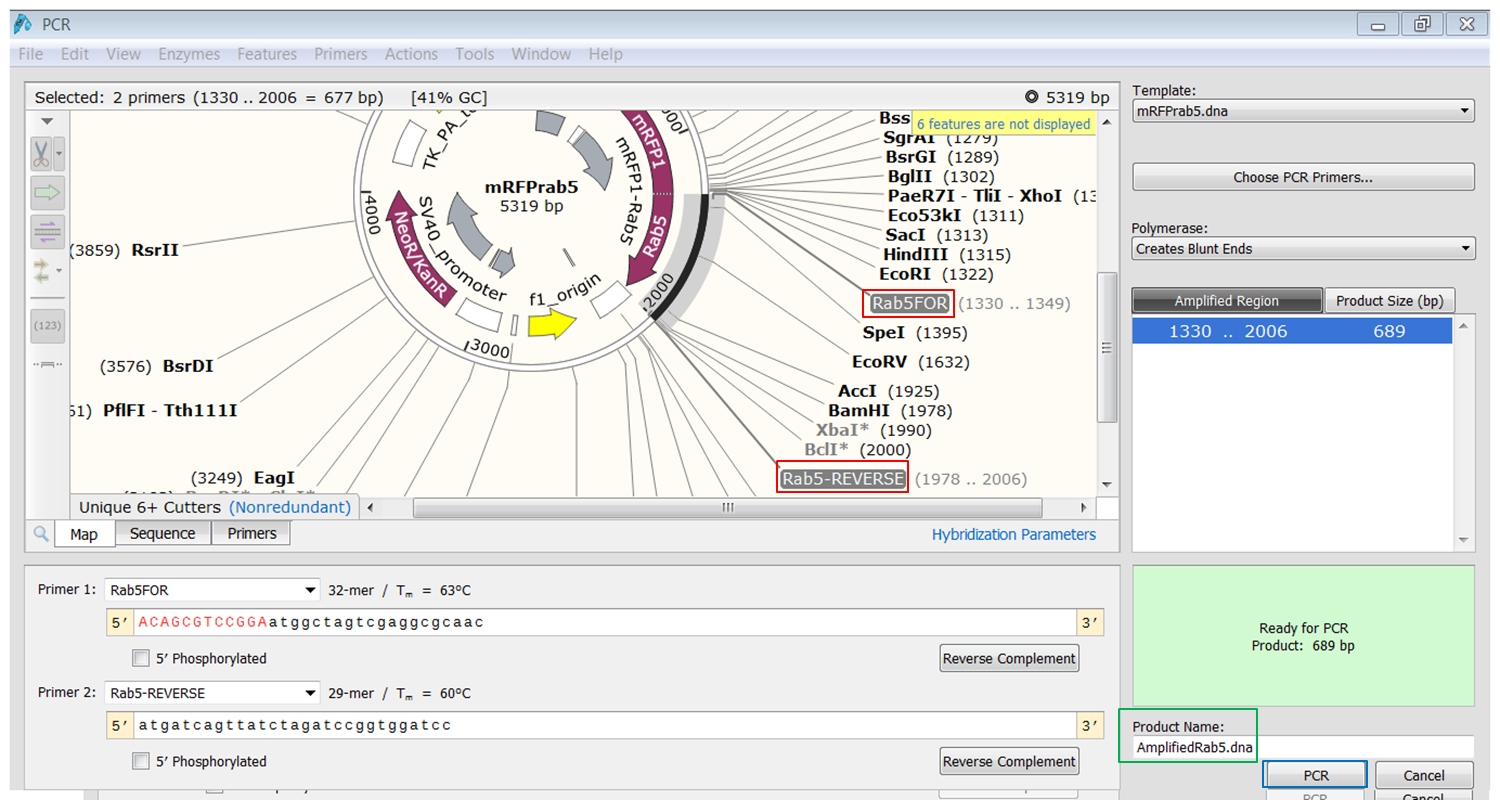
| Create the product that would be generated when doing PCR with the primers. |
|---|
| Expand Actions in the top menu and select PCR
The primers that you selected are now shown in purple on the map. To select the sequence to amplify:
The PCR product opens in a new window. |
Exercise: generate a PCR product of the AcGFP1 gene
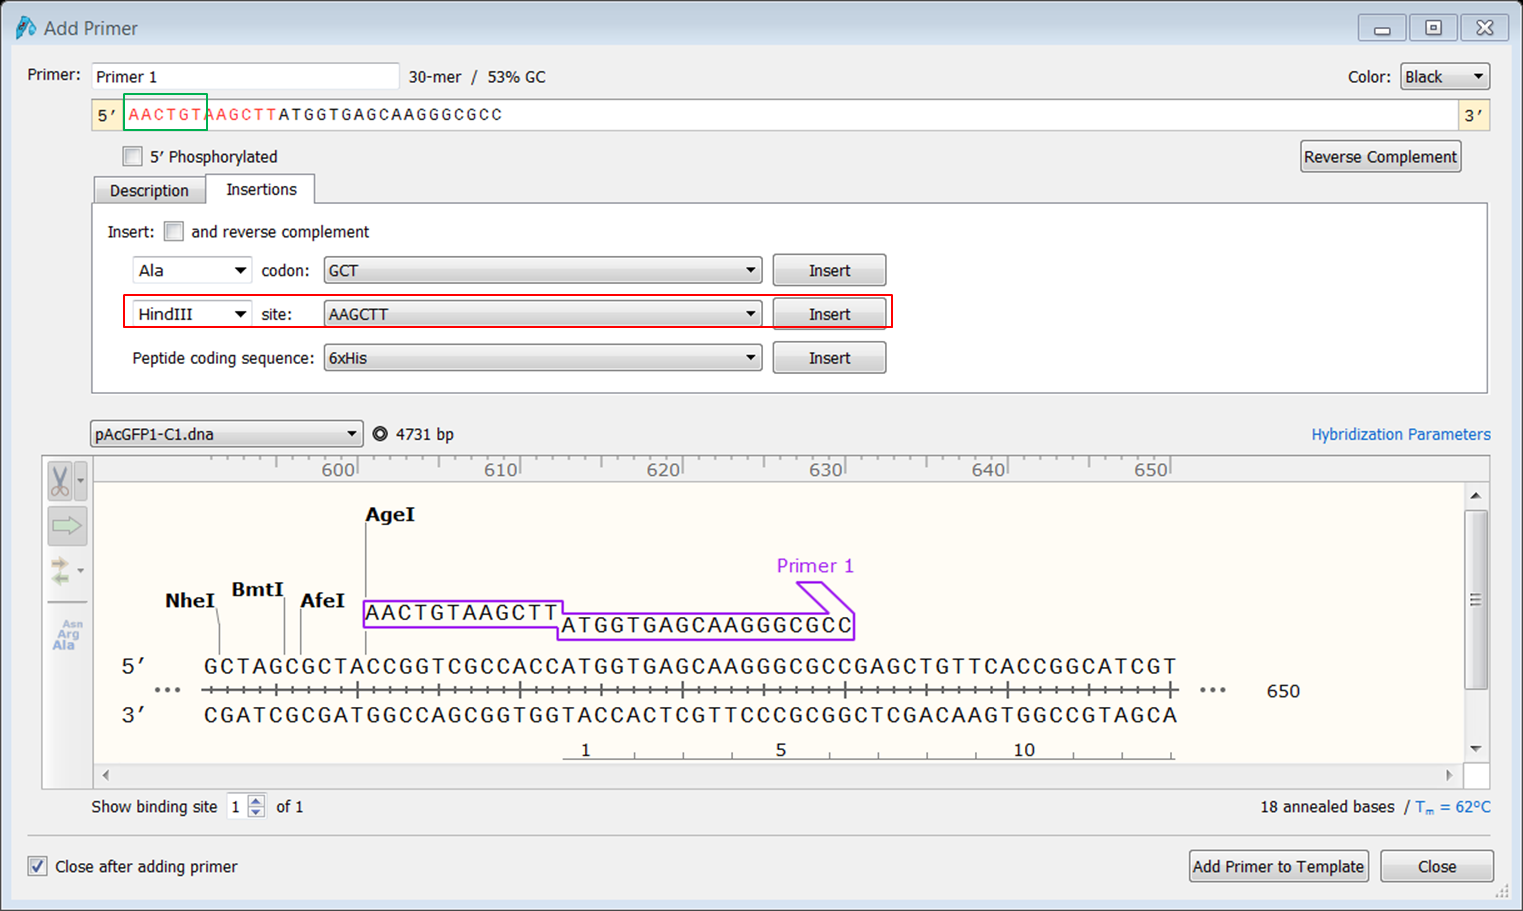
To clone the fusion into the pCDNA3 vector we need a HindIII restriction site at the 5' end of AcGFP1. We will design a forward primer that starts at the ATG of the gene and contains a HindIII restriction site.
| Create the forward primer. |
|---|
|
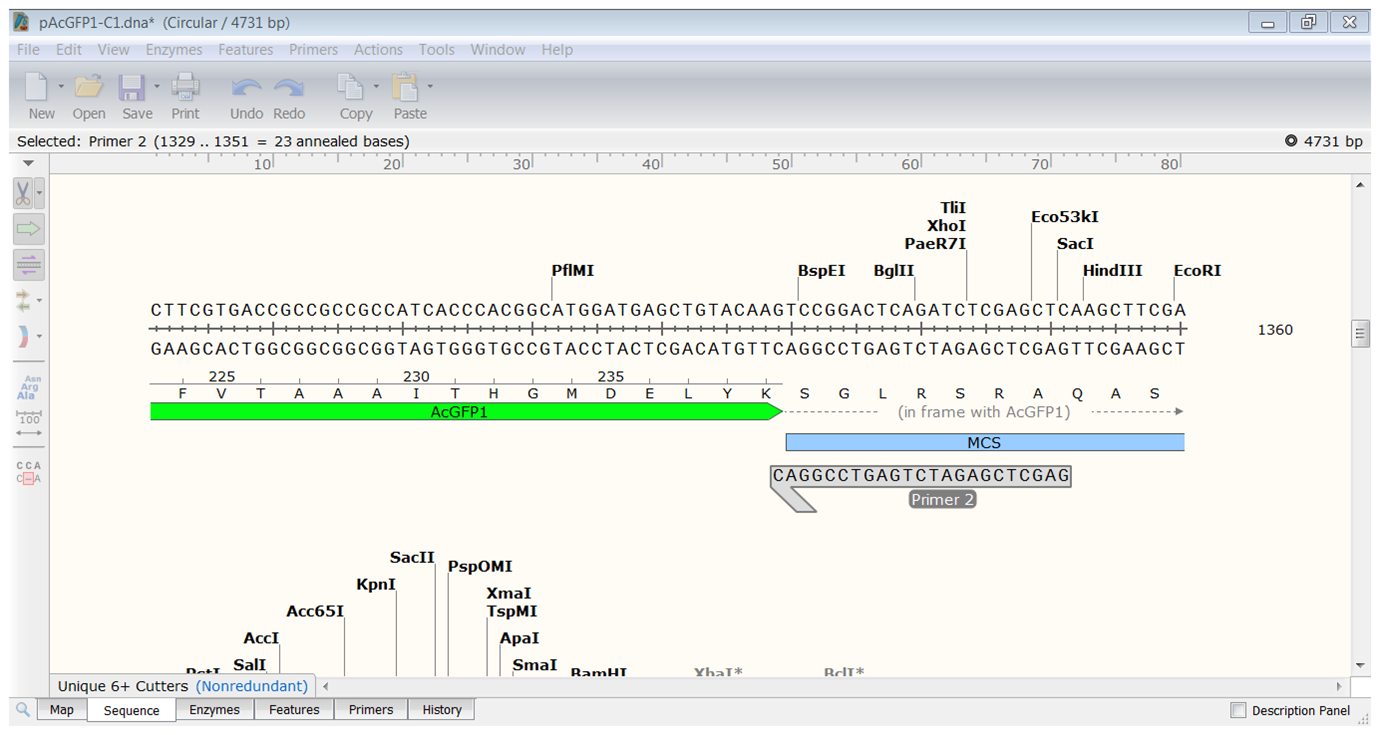
At the 3' end of the AcGFP1 you want to use the BspEI restriction site for making the fusion with Rab5 so locate the reverse primer close to the BspEI site. Since you are going to use HindIII at the 5' end you might want to avoid including the HindIII site downstream of AcGFP1.
| Create the reverse primer. |
|---|
| Start the primer before the HindIII site and extend until you have a primer thas has a Tm of 61-62°C.</li> |
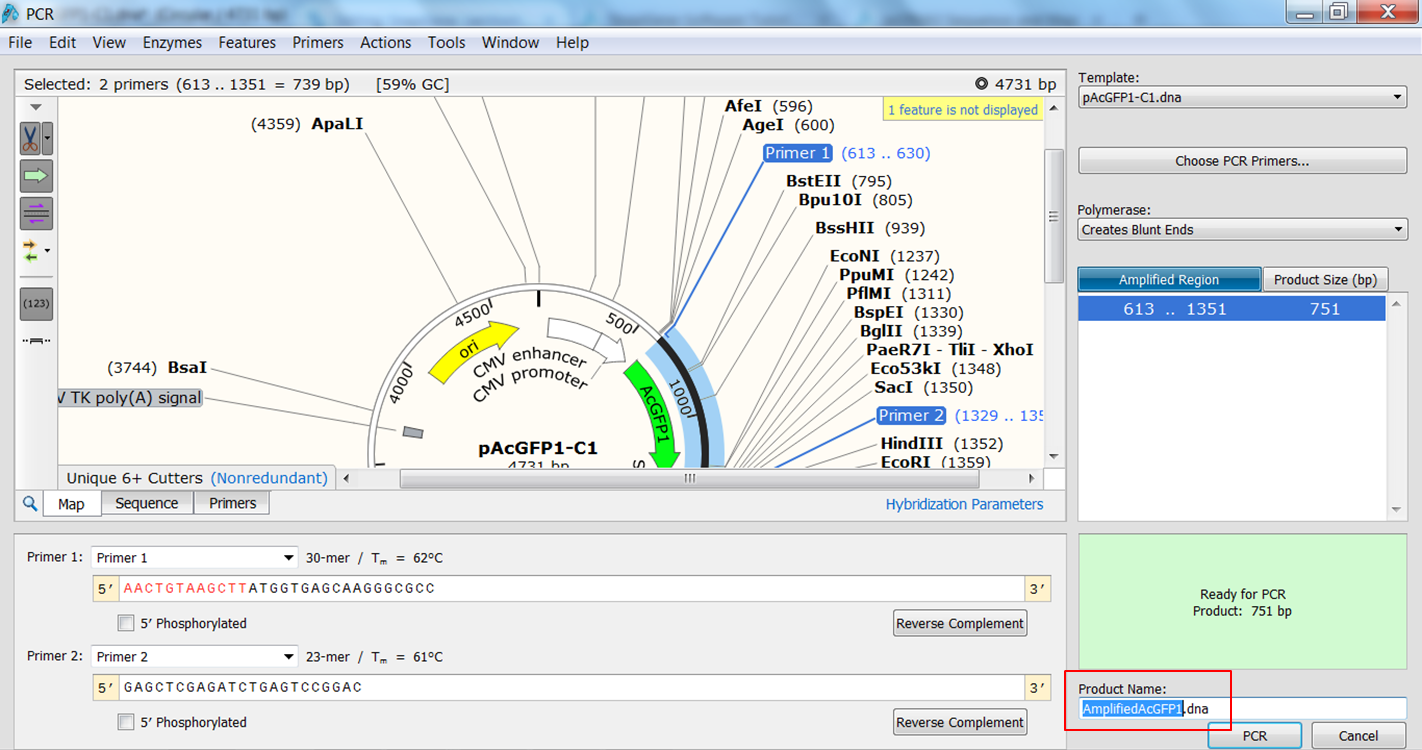
| Create the PCR product. |
|---|
The PCR product opens in a new window. |
See the Primers, PCR and Mutagenesis video tutorial for further details on how to make primers, and to simulate PCR and primer-directed mutagenesis in SnapGene.
Restriction cloning in SnapGene
Restriction cloning of a single fragment
Go to the Restriction cloning of a single fragment in SnapGene tutorial for an overview of how to insert a fragment into a vector using restriction enzymes.
Restriction cloning of multiple fragments
In a similar way you can insert multiple fragments in the vector. This time we want to clone AcGFP1 and Rab5 as a fusion in the pcDNA3 vector (.dna file already present in the /Documents/SnapGene/ folder on the BITS laptops)
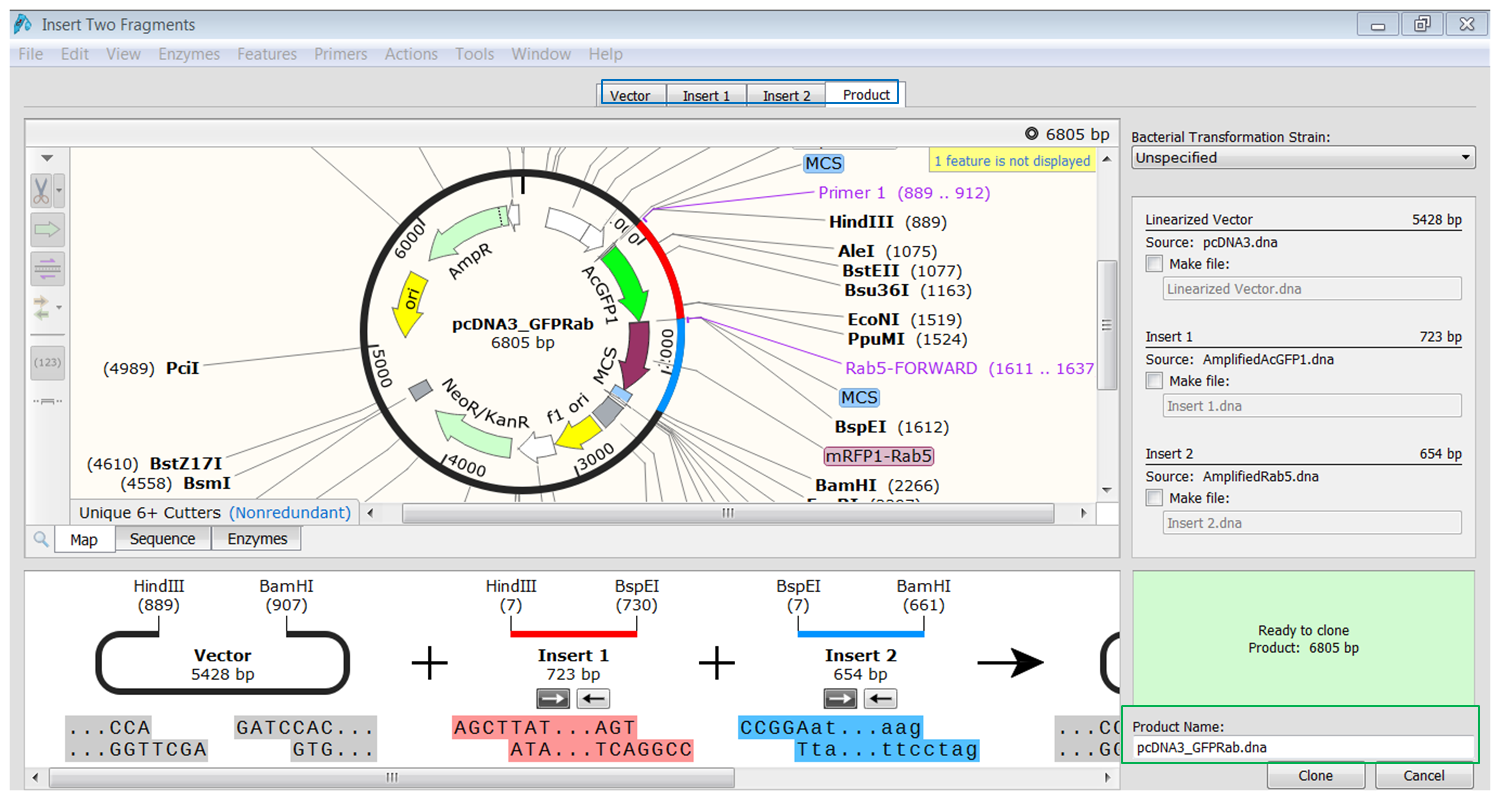
We will fuse AcGFP1 and Rab5 via the BspE1 restriction sites and clone the fusion in the pcDNA3 vector via the HindIII and BamHI restriction sites.
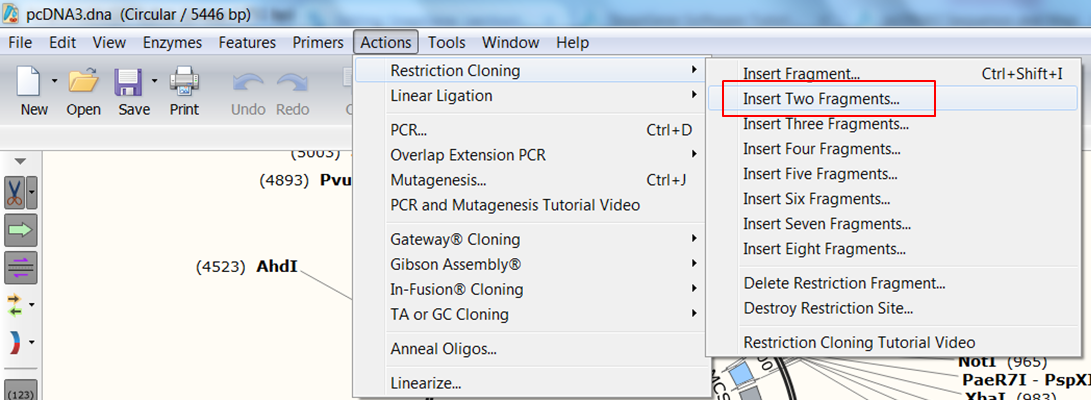
| Indicate that you want to clone two fragments. |
|---|
| In the top menu expand Actions, in the Restriction cloning section select Insert Two Fragments |
This opens the Cloning window with an extra tab (blue) because you have an extra insert.
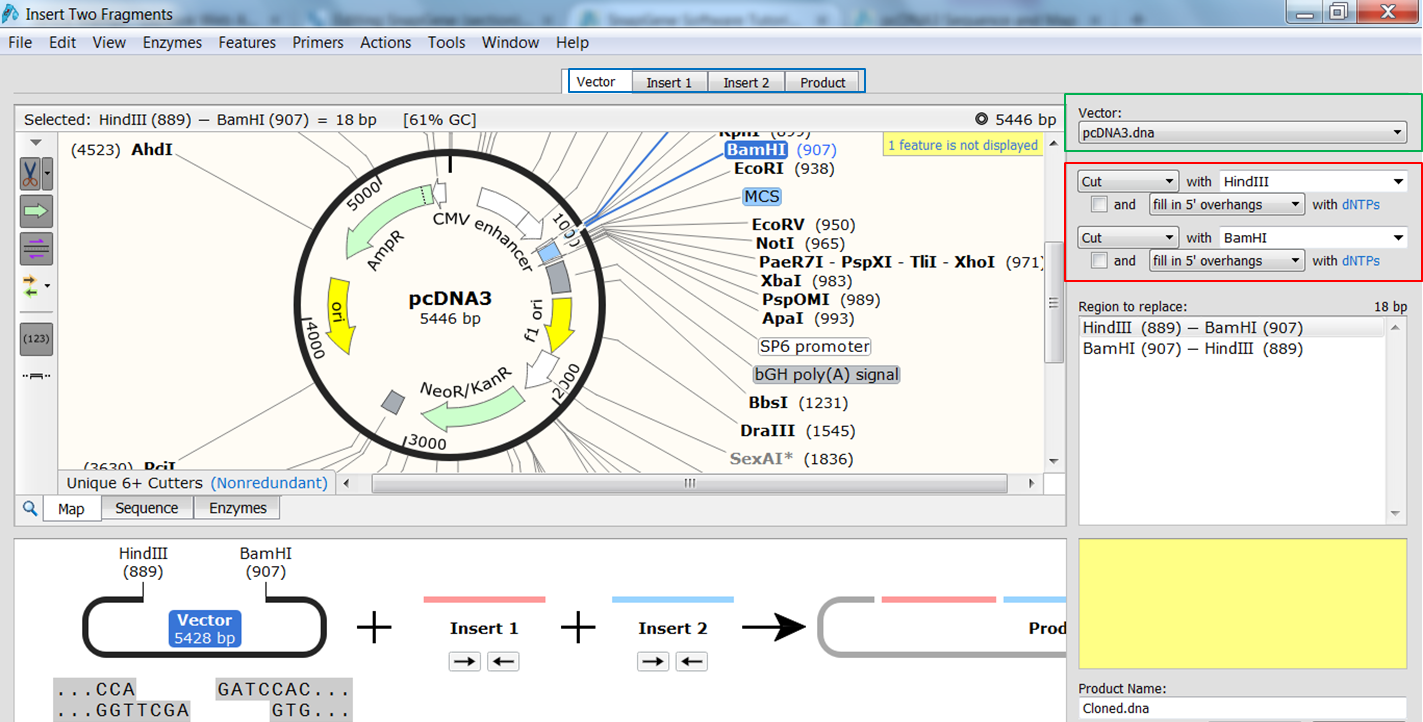
| Indicate the fragment of the vector that is to be replaced. |
|---|
| Select the vector (green) and the enzymes (red) you want to use for the cloning (green). This defines the fragment that is to be replaced during the cloning. The sites and the fragment should be colored blue upon selection. |
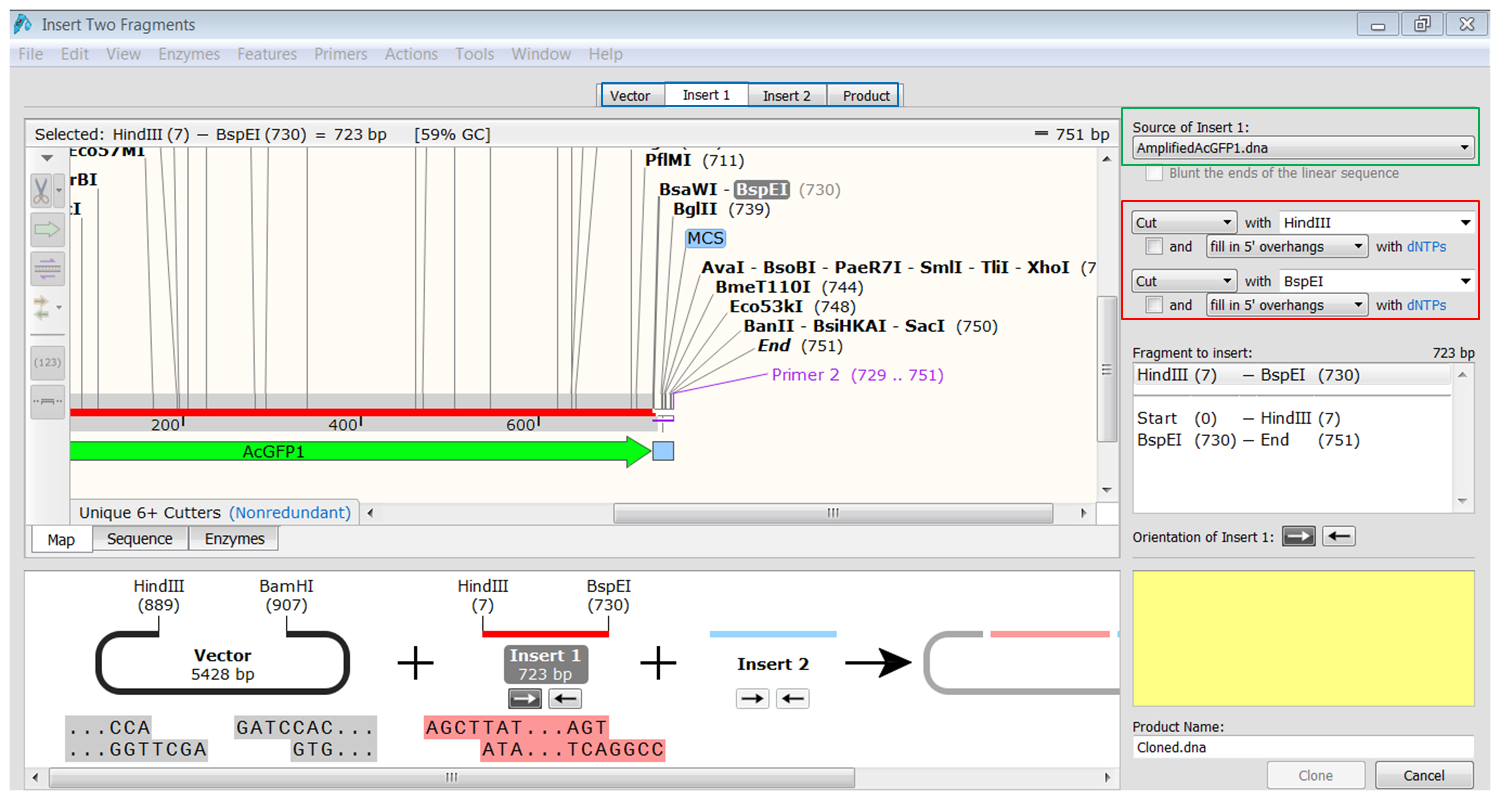
| Generate the first fragment (AcGFP1) you are going to use. |
|---|
| Click the Insert1 tab (blue) and select the first fragment (green) and the enzymes (red) you want to use for the cloning. This defines the first fragment that is to be inserted during the cloning. The sites and the selected fragment should be colored blue upon selection. |
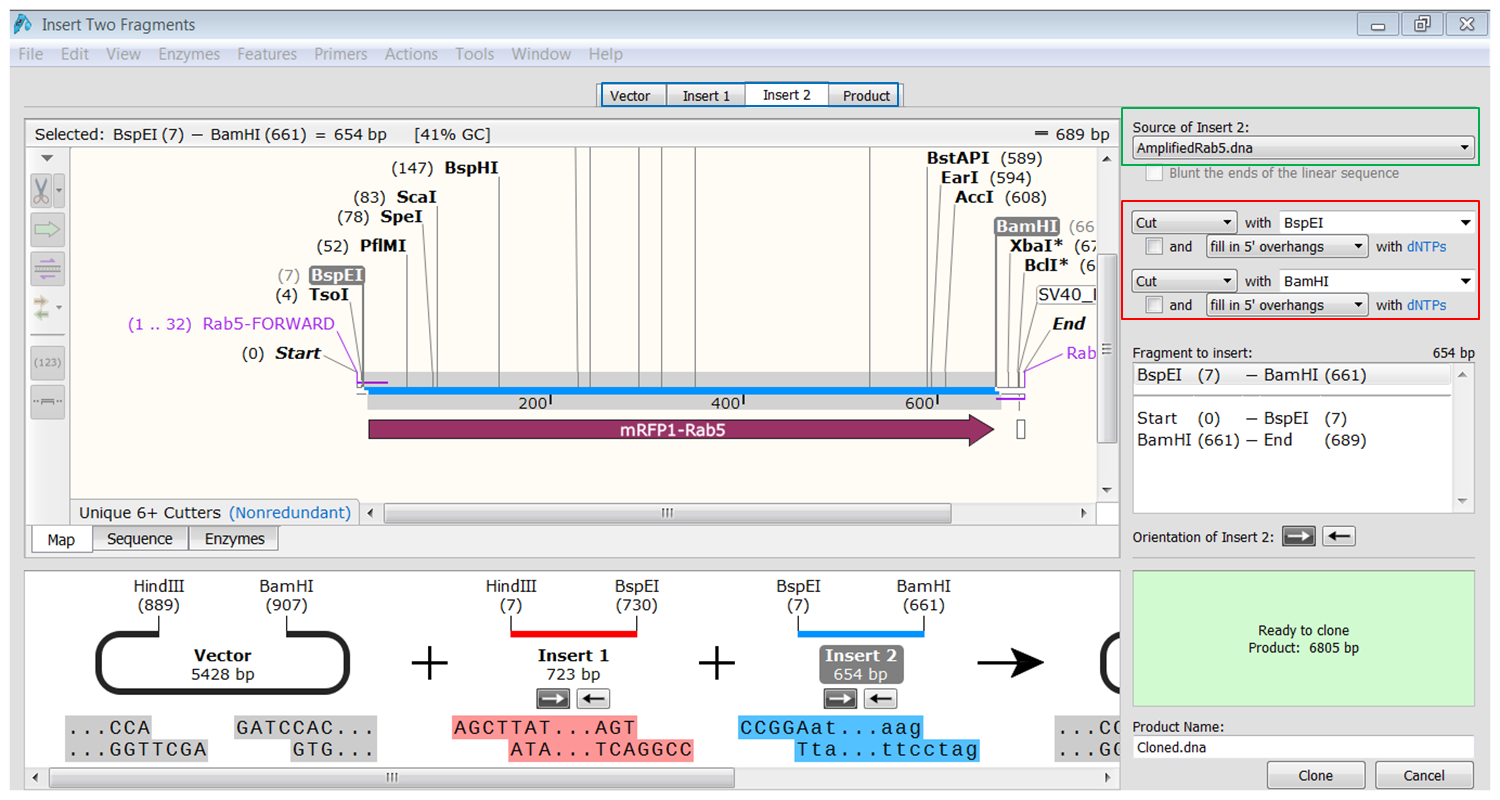
| Generate the second fragment (Rab5) you are going to use. |
|---|
| Click the Insert2 tab (blue) and select the second fragment (green) and the enzymes (red) you want to use for the cloning. This defines the second fragment that is to be inserted during the cloning. The sites and the selected fragment should be colored blue upon selection. |
| Perform the cloning. |
|---|
| Click the tab containing info of the product (blue). You see the fragments inserted in the vector. The fragments are colored red and blue. Type a name for the product (green) and click Clone to generate the product. |
See the Restriction Cloning video tutorial for further details on how SnapGene can simulate restriction cloning while helping you to visualize, control, and document the process.
Fusion-based cloning in SnapGene
In-Fusion cloning is a method for cloning seamless gene fusions. In the In-Fusion reaction, a linearized vector is mixed with one or more PCR products that have overlapping ends. The resulting fusion has ends that overlap with the vector sequence thereby inserting the fusion into the vector.

Other companies have developed similar cloning systems e.g. Cold Fusion, Fast Fusion...
Fusion-based cloning is dead-easy in SnapGene since it is supported and has its own cloning editor. We will do an example using a special In-fusion vector but the procedure will work with any vector.
Go to the Fusion-based cloning in SnapGene tutorial to see how to clone a fragment into a vector based on PCR using overlapping primers.
Gateway cloning in SnapGene
Cloning can be done without restriction enzymes using Gateway® cloning, which inserts fragments by recombination. The fragment is inserted into a Donor Vector in a BP cloning reaction, creating an Entry Vector. Then the fragment is transferred to a Destination Vector in an LR cloning reaction, creating the final Expression Vector. Gateway® cloning allows up to four fragments to be inserted simultaneously.
Gateway cloning is easy in SnapGene since it is supported and has its own cloning editor. Just as for Fusion-based cloning SnapGene automates the primer design. To plan a Gateway cloning, just select the fragments that you wish to stitch together and SnapGene chooses suitable primers.
Go to the Gateway cloning in SnapGene tutorial to see how to clone a fragment into a vector based on recombination.
TA and GC cloning in SnapGene
See the TA and GC Cloning video tutorial for further details on how SnapGene can simulate TA or GC cloning while helping you to visualize, control, and document the process.
